基于kubernet部署jenkins方法验证(CI)
本博客所有文章采用的授权方式为 自由转载-非商用-非衍生-保持署名 ,转载请务必注明出处,谢谢。
背景
尝试通过在 k8s环境部署jenkins的持续集成环境,我们的目标是 产出包含linux-kernel的一个可以安装的ISO包。
考虑到k8s 生态已经有现成的jenkins docker image,免除了配置的烦恼。首先尝试了 基于helm的jenkins安装包,但是使用后发现pv的绑定一直有些问题。后来采用了手动创建k8s 编排对象的方式(编写yaml文件)来创建jenkis服务。(具体内容可以参考github链接:https://github.com/jamesWsg/myown/tree/master/kubernets_ymal/jenkins-server)。
原来打算build环境也做成容器的方式,方便后续管理,但是发现dockerfile在build image时,因为安装grub需要手动选择,无法正常build出镜像(通过启动容器,再安装grub和其他依赖的包可以避免该问题,但是在build ceph的过程中 c++编译器会报错退出,详见文档最后的附录,所以容器的路子就不可行了)。
所以,本次jenkins部署的方式为 server端部署在k8s 容器中,具体负责build任务的work-node放在vm上(vm的资源不能太少,台湾build环境是32核,32G),所以本文主要包括jenkins server部署和work-node部署,详细过程整理如下
jenkins server部署
注意,在 删除部署后,pv资源不会释放,需要手动删除pv 资源。
-
准备k8s 配置文件
主要包括 pv和pvc 配置文件,考虑到jenkins需要对外提供服务,可以采用NodePort的方式。编排对象目前采用的是deployment,声明nfs的存储空间,所有文件已经放到了github目录供后续参考
https://github.com/jamesWsg/myown/tree/master/kubernets_ymal/jenkins-server
wsg@ubuntu16:~/helm/jenkins/aliyun$ ll
total 44
drwxrwxr-x 2 wsg wsg 4096 Feb 14 19:35 ./
drwxrwxr-x 5 wsg wsg 4096 Feb  9 14:57 ../
-rw-rw-r-- 1 wsg wsg 9965 Feb  9 17:19 iptable_export
-rw-rw-r-- 1 wsg wsg 9965 Feb  9 17:38 iptable_export_new
-rw-rw-r-- 1 wsg wsg 1297 Feb 11 13:15 jenkins_nodePort.yml
-rw-rw-r-- 1 wsg wsg 1309 Feb  9 14:58 jenkins.yml
-rw-rw-r-- 1 wsg wsg  284 Feb 11 12:56 pv.yml
wsg@ubuntu16:~/helm/jenkins/aliyun$ pwd
/home/wsg/helm/jenkins/aliyun
wsg@ubuntu16:~/helm/jenkins/aliyun$
pv.yml 内容如下: pv的名字为 jenkins-new,是一个 nfs
  apiVersion: v1
  kind: PersistentVolume
  metadata:
    name: jenkins-new
    namespace: ci
  spec:
    capacity:
      storage: 500Gi
    accessModes:
      - ReadWriteMany
    persistentVolumeReclaimPolicy: Retain
    nfs:
      server: 172.17.73.38
      path: /vol/kubernet-nfs
阿里云 最新的 jenkins版本:Jenkins 2.46.2 配置文件中 采用的jenkins镜像为image: jenkins/jenkins:2.204(从官方镜像库pull,可以替换为更新的版本。)
```
-
apply上面配置文件
因为上面的配置文件中,都声明在了 ci namespce,所以需要提前创建该 命名空间
wsg@ubuntu16:~/helm/jenkins/aliyun$ kubectl create namespace ci
namespace/ci created

kubectl apply -f pv.yml
kubectl apply -f jenkins_nodePort.yml
-
检查配置生效情况
检查pv情况,看起来pv 并没有分 namespace
wsg@ubuntu16:~/helm/jenkins/aliyun$ kubectl -n ci get pv
NAME                    CAPACITY   ACCESS MODES   RECLAIM POLICY   STATUS        CLAIM                                                                                                      STORAGECLASS    REASON   AGE
jenkins                 5Gi        RWX            Retain           Terminating   ci/jenkins                                                                                                                          18d
jenkins-new             500Gi      RWX            Retain           Bound         ci/jenkins-new                                                                                                                      16d
local-pv                200Gi      RWO            Retain           Bound         default/prometheus-wsg-prometheus-operator-prometheus-db-prometheus-wsg-prometheus-operator-prometheus-0   local-storage            51d
wsg-nfs-prometheus-pv   100Gi      RWO            Retain           Released      default/prometheus-wsg-prometheus-operator-prometheus-db-prometheus-wsg-prometheus-operator-prometheus-0   manual                   52d
wsg@ubuntu16:~/helm/jenkins/aliyun$
检查pod 和service 情况
wsg@ubuntu16:~/helm/jenkins/aliyun$ kubectl -n ci get pod
NAME                       READY   STATUS        RESTARTS   AGE
jenkins-bd446b4f-cwqw7     1/1     Running       0          11d
wsg@ubuntu16:~/helm/jenkins/aliyun$
wsg@ubuntu16:~/helm/jenkins/aliyun$ kubectl -n ci get service
NAME          TYPE       CLUSTER-IP       EXTERNAL-IP   PORT(S)                        AGE
jenkins-svc   NodePort   10.105.253.167   <none>        80:30080/TCP,50000:30436/TCP   16d
wsg@ubuntu16:~/helm/jenkins/aliyun$
可以进一步查看service 的endpoint
wsg@ubuntu16:~/helm/jenkins/aliyun$ kubectl -n ci get ep jenkins-svc NAME ENDPOINTS AGE jenkins-svc 10.32.0.59:8080,10.32.0.59:50000 16d wsg@ubuntu16:~/helm/jenkins/aliyun$ -
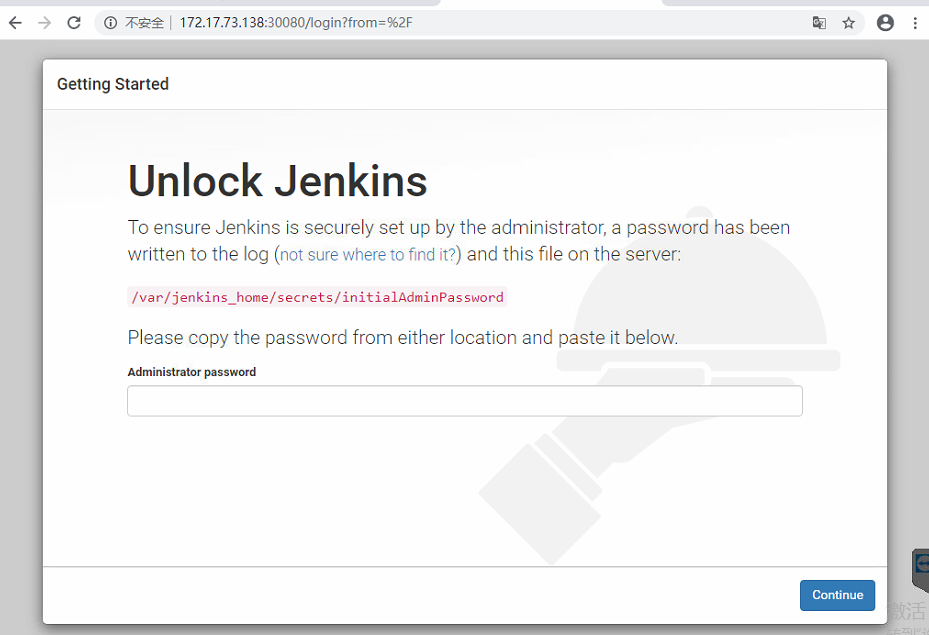
jenkins pod运行正常后,就可以进行初始化 jenkins服务了,通过nodePort定义的端口。密码文件位于 jenkins pod的 persistent volume(这里是 nfs挂载点),通过下面的密码登陆后,进行相关的初始化(创建管理用户,选择安装的插件,插件联网安装,速度比较慢。)
root@node3:/var/share/ezfs/shareroot/kubernet-nfs/secrets# ll
total 4
drwx------ 1 root root     4237 Feb  9 16:31 ./
drwxrwxrwx 1 root root 81715926 Feb  9 18:53 ../
drwxr-xr-x 1 root root     2312 Feb  9 16:31 filepath-filters.d/
-rw-r--r-- 1 root root       48 Feb  9 16:31 hudson.console.ConsoleNote.MAC
-rw-r--r-- 1 root root      272 Feb  9 16:31 hudson.util.Secret
-rw-r----- 1 root root       33 Feb  9 16:31 initialAdminPassword
-rw-r--r-- 1 root root       32 Feb  9 16:31 jenkins.model.Jenkins.crumbSalt
-rw-r--r-- 1 root root       48 Feb  9 16:31 jenkins.security.ApiTokenProperty.seed
-rw-r--r-- 1 root root      256 Feb  9 16:31 master.key
-rw-r--r-- 1 root root      272 Feb  9 16:31 org.jenkinsci.main.modules.instance_identity.InstanceIdentity.KEY
-rw-r--r-- 1 root root        5 Feb  9 16:31 slave-to-master-security-kill-switch
drwxr-xr-x 1 root root      959 Feb  9 16:31 whitelisted-callables.d/
root@node3:/var/share/ezfs/shareroot/kubernet-nfs/secrets# cat initialAdminPassword
84b71054ff7b41d29c4b8631cf944b45
root@node3:/var/share/ezfs/shareroot/kubernet-nfs/secrets#
jenkins增加work-node
完成上面的jenkins 配置后,就可以配置work-node,work-node的环境才是真正的编译环境,它会从 jenkins server收到编译的任务。work-node和server端之间的通讯可以通过ssh和jnlp,文章最后也会给出基于容器的work-node的部署方法,这里主要记录基于vm的work-node 部署方式。ssh方式 本质上 是jenkins server通过ssh的方式,将 agent.jar 包 传输到 work-node节点,然后通过work-node的java环境,执行该jar包,最终实现和server端的jnlp通讯。
注意:build 环境 至少需要 18G的内存,CPU 16核,(测试 用8G的内存 会失败),所以work-node节点也需要达到该要求。
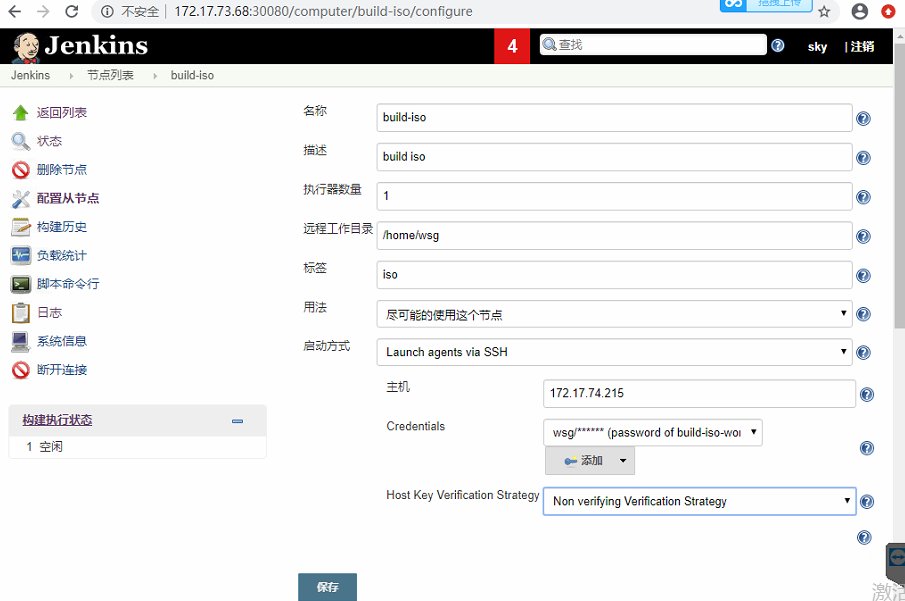
-
work-node 是基于开源ubuntu14,需要java8的环境,实现和jenkins server 通讯
安装java8 的步骤,这里使用了ppa的repository

sudo add-apt-repository ppa:openjdk-r/ppa
sudo apt-get update
sudo apt-get install openjdk-8-jdk


wsg@ubuntu14:/mnt/GIT-iscsi/GIT/virtualstor-7.0$ sudo update-alternatives --config java
[sudo] password for wsg:
There are 2 choices for the alternative java (providing /usr/bin/java).

  Selection    Path                                            Priority   Status
------------------------------------------------------------
* 0            /usr/lib/jvm/java-7-openjdk-amd64/jre/bin/java   1071      auto mode
  1            /usr/lib/jvm/java-7-openjdk-amd64/jre/bin/java   1071      manual mode
  2            /usr/lib/jvm/java-8-openjdk-amd64/jre/bin/java   1069      manual mode

Press enter to keep the current choice[*], or type selection number:
-
work-node的相关环境变量汇总
另外,需要安装的编译依赖包很多,通过在tw机器上扣取了所有的包信息(近2千个deb包),也放在了github上,方便后续
https://github.com/jamesWsg/myown/tree/master/docker-file/ubuntu14_build_env/
git仓库为iscsi lun,挂载路径如下:
wsg@ubuntu14:/mnt/GIT-iscsi/GIT/virtualstor-7.0$

创建java的链接,
wsg@ubuntu14:~/workspace$ ll /usr/local/bin/java
lrwxrwxrwx 1 root root 46 Feb 28 14:34 /usr/local/bin/java -> /usr/lib/jvm/java-8-openjdk-amd64/jre/bin/java*
wsg@ubuntu14:~/workspace$
有了上面的java 环境,就可以在 jenkins server端增加该work-node

-
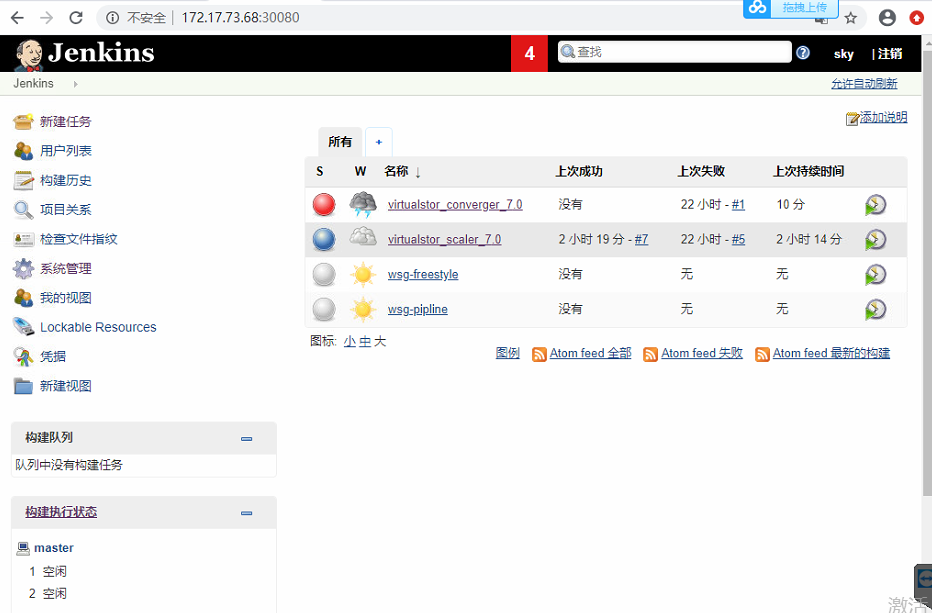
jenkins 配置pipeline
需要指定该pipeline的执行节点,默认是放在master 节点,因为这里专门准备了work-node,需要指定到该node(通过创建node时设置的label来指定,上一步我们指定了label为iso)。目前所有pipeline(free style)中照搬了台北的配置,后续可以将pipeline改进为jenkinsfile,这样避免后续通过ui的繁琐配置,同时可以将 jeninsfile加入git仓库进行管理。
-
执行pipeline
配置完成后,就可以正常执行pipeline。因为该pipeline过程中有pull git 仓库的过程,耗时比较久,所以一般提前在该 work-node上提前pull好对应的代码。后面章节会 单独说明。
git 仓库准备
虽然上面执行pipeline 的过程中,会自动
git 的配置参考(.gitconfig文件),ssh key拷贝到对应位置(仓库已经添加好的key)
完成上面的jenkins 配置后,就可以
manu-Inspiron-5748 ~ » cat .gitconfig
[user]
	email = ####
	name = shengguo
[core]
	editor = vim
[filter "lfs"]
	clean = git-lfs clean -- %f
	smudge = git-lfs smudge --skip -- %f
	process = git-lfs filter-process --skip
	required = true
-
拉取我们的代码,(包括 ezs3-ceph和 linux kernel submoudle)
- checkout 到对应的分支
- git lfs fetch 补全所有文件
- 注意submoudule的HEAD 位置(一般主git checkout到7.0版本就可以了)
-
知识点记录
build docker image 相关
一开始,打算将work-node环境也放在容器中,但是发现dockerfile在build image时,因为安装grub需要手动选择,无法正常build出镜像。通过启动容器,再安装grub和其他依赖的包可以避免该问题,但是在build ceph的过程中 c++编译器会报错退出,详见文档最后的附录,所以容器的路子就不可行了。
但是该过程也积累了关于dockfile相关的知识,所以相关代码整理了放在 github中供 后续参考。
https://github.com/jamesWsg/myown/tree/master/docker-file/ubuntu14_build_env/ubuntu
相关的知识点概况如下:
- dockerfile中apt-get安装几百个deb时的换行方法
- dockerfile中增加文件和文件夹
- dockerfile中dpkg命令
- dockerfile中执行bash命令
- apt-get source的gpg key配置
需要 安装 git 的新版本,git-lfs,libzfs,第三方的repository
docker image build过程中增加了 source.list 文件,repo的gpg key,git的配置文件,ssh key文件,
docker file 的git hub仓库
jenkins pipeline 配置
配置的pipeline 会在 workspace 目录生成 pipeline name的目录,该目录 内会创建 该pipline 配置的git 仓库
jenkins虽然会自动帮你拉对应的git仓库,但是耗时比较久,如果有提前pull好的仓库,也可以直接在workspace 创建软连接,链接到提前拉好的仓库。
本次测试就是软链接到 提前拉好的仓库
wsg@ubuntu14:~/workspace$ ll
total 12
drwxrwxr-x  3 wsg wsg 4096 Feb 29 09:06 ./
drwxr-xr-x 16 wsg wsg 4096 Feb 29 11:13 ../
drwxrwxr-x  3 wsg wsg 4096 Feb 28 16:05 virtualstor_converger_7.0/
lrwxrwxrwx  1 wsg wsg   35 Feb 29 09:06 virtualstor_scaler_7.0 -> /mnt/GIT-iscsi/GIT/virtualstor-7.0//
wsg@ubuntu14:~/workspace$ pwd
/home/wsg/workspace
wsg@ubuntu14:~/workspace$
jenkins的work-node 类型(ssh,jnlp)
https://github.com/jenkinsci/ssh-slaves-plugin/blob/master/doc/CONFIGURE.md
-
基于ssh的方式
ui上选择 通过ssh方式,增加 worknode的 ssh 用户信息(新加credential),如下
-
基于jnlp的方式
  官方jnlp docker 镜像中的 java 信息

  jenkins@6e039dbe7379:~/agent$ java -version
  openjdk version "1.8.0_242"
  OpenJDK Runtime Environment (build 1.8.0_242-b08)
  OpenJDK 64-Bit Server VM (build 25.242-b08, mixed mode)
  jenkins@6e039dbe7379:~/agent$
更改 service 类型为 nodePort后
service的原理是通过 kube-proxy 来创建 对应的iptable规则,根据张磊的课程,
wsg@ubuntu16:~/kube_ymal/pv_pvc$ sudo iptables -L |grep -Ei Chain
Chain INPUT (policy ACCEPT)
Chain FORWARD (policy DROP)
Chain OUTPUT (policy ACCEPT)
Chain DOCKER (1 references)
Chain DOCKER-ISOLATION-STAGE-1 (1 references)
Chain DOCKER-ISOLATION-STAGE-2 (1 references)
Chain DOCKER-USER (1 references)
Chain KUBE-EXTERNAL-SERVICES (1 references)
Chain KUBE-FIREWALL (2 references)
Chain KUBE-FORWARD (1 references)
Chain KUBE-SERVICES (3 references)
Chain WEAVE-NPC (1 references)
Chain WEAVE-NPC-DEFAULT (1 references)
Chain WEAVE-NPC-EGRESS (2 references)
Chain WEAVE-NPC-EGRESS-ACCEPT (8 references)
Chain WEAVE-NPC-EGRESS-CUSTOM (1 references)
Chain WEAVE-NPC-EGRESS-DEFAULT (1 references)
Chain WEAVE-NPC-INGRESS (1 references)
wsg@ubuntu16:~/kube_ymal/pv_pvc$
vm build 环境的内核版本虽然有 差异,但是可以正常 build
这次采用的vm 内核版本
wsg@ubuntu14:/mnt/GIT-iscsi/GIT/virtualstor$ cat /etc/issue
Ubuntu 14.04.6 LTS \n \l
wsg@ubuntu14:~$ uname -a
Linux ubuntu14 4.4.0-31-generic #50~14.04.1-Ubuntu SMP Wed Jul 13 01:07:32 UTC 2016 x86_64 x86_64 x86_64 GNU/Linux
wsg@ubuntu14:~$
台湾原来采用的 内核版本
bean_li@buildman-trusty:~$ cat /etc/issue
Ubuntu 14.04.4 LTS \n \l
bean_li@buildman-trusty:~$ uname -a
Linux buildman-trusty 3.13.0-32-generic #57-Ubuntu SMP Tue Jul 15 03:51:08 UTC 2014 x86_64 x86_64 x86_64 GNU/Linux
bean_li@buildman-trusty:~$
NodePort的语法
- port 必须定义,否则报错如下
  ersistentvolumeclaim/jenkins created
  serviceaccount/jenkins created
  clusterrolebinding.rbac.authorization.k8s.io/jenkins created
  deployment.extensions/jenkins created
  error: error validating "jenkins_nodePort.yml": error validating data: [ValidationError(Service.spec.ports[0]): missing required field "port" in io.k8s.api.core.v1.ServicePort, ValidationError(Service.spec.ports[1]): missing required field "port" in io.k8s.api.core.v1.ServicePort]; if you choose to ignore these errors, turn validation off with --validate=false
  wsg@ubuntu16:~/helm/jenkins/aliyun$ ll
-
nodePort 需要在 指定范围,否则报错如下
wsg@ubuntu16:~/helm/jenkins/aliyun$ kubectl apply -f jenkins_nodePort.yml
persistentvolumeclaim/jenkins unchanged
serviceaccount/jenkins unchanged
clusterrolebinding.rbac.authorization.k8s.io/jenkins unchanged
deployment.extensions/jenkins unchanged
The Service "jenkins-svc" is invalid: spec.ports[0].nodePort: Invalid value: 80: provided port is not in the valid range. The range of valid ports is 30000-32767
wsg@ubuntu16:~/helm/jenkins/aliyun$
问题处理记录
pod无法访问internet
原因是 pod所在host节点的 dns没有配置,具体处理过程记录如下:
pod中是可以和 internet联通,但是 域名无法解析
wsg@ubuntu16:~/helm/jenkins/aliyun$ kubectl -n ci exec jenkins-5494d984bf-js2kk -- sh -c 'ping -c 10 8.8.8.8'
PING 8.8.8.8 (8.8.8.8): 56 data bytes
64 bytes from 8.8.8.8: icmp_seq=1 ttl=50 time=34.712 ms
64 bytes from 8.8.8.8: icmp_seq=2 ttl=50 time=35.232 ms
64 bytes from 8.8.8.8: icmp_seq=3 ttl=50 time=35.114 ms
64 bytes from 8.8.8.8: icmp_seq=4 ttl=50 time=35.527 ms
64 bytes from 8.8.8.8: icmp_seq=5 ttl=50 time=34.882 ms
64 bytes from 8.8.8.8: icmp_seq=6 ttl=50 time=35.470 ms
64 bytes from 8.8.8.8: icmp_seq=7 ttl=50 time=35.208 ms
64 bytes from 8.8.8.8: icmp_seq=8 ttl=50 time=34.943 ms


访问域名
wsg@ubuntu16:~/helm/jenkins/aliyun$ kubectl -n ci exec jenkins-5494d984bf-js2kk -- sh -c 'curl cn.bing.com'
  % Total    % Received % Xferd  Average Speed   Time    Time     Time  Current
                                 Dload  Upload   Total   Spent    Left  Speed
  0     0    0     0    0     0      0      0 --:--:--  0:00:19 --:--:--     0curl: (6) Could not resolve host: cn.bing.com
command terminated with exit code 6
wsg@ubuntu16:~/helm/jenkins/aliyun$
但是发现 其他的pod 可以访问 internet
系统pod,位于 master 节点上。coredns pod 2个 不知为啥 都 运行在 master 节点。??
wsg@ubuntu16:~$ kubectl -n kube-system  exec etcd-ubuntu16  -- sh -c 'ping  cn.bing.com'
PING cn.bing.com (202.89.233.101): 56 data bytes
64 bytes from 202.89.233.101: seq=0 ttl=118 time=26.530 ms
64 bytes from 202.89.233.101: seq=1 ttl=118 time=26.321 ms
64 bytes from 202.89.233.101: seq=2 ttl=118 time=26.771 ms
64 bytes from 202.89.233.101: seq=3 ttl=118 time=26.257 ms
64 bytes from 202.89.233.101: seq=4 ttl=118 time=26.493 ms
64 bytes from 202.89.233.101: seq=5 ttl=118 time=26.136 ms
64 bytes from 202.89.233.101: seq=6 ttl=118 time=26.422 ms
64 bytes from 202.89.233.101: seq=7 ttl=118 time=26.570 ms
64 bytes from 202.89.233.101: seq=8 ttl=118 time=26.313 ms
64 bytes from 202.89.233.101: seq=9 ttl=118 time=26.346 ms
64 bytes from 202.89.233.101: seq=10 ttl=118 time=25.904 ms
64 bytes from 202.89.233.101: seq=11 ttl=118 time=26.159 ms
64 bytes from 202.89.233.101: seq=12 ttl=118 time=26.241 ms

wsg@ubuntu16:~$ kubectl -n kube-system  exec etcd-ubuntu16  -- sh -c 'cat /etc/resolv.conf'
nameserver 114.114.114.114
wsg@ubuntu16:~$ kubectl -n kube-system  exec etcd-ubuntu16  -- sh -c 'cat /etc/hosts'
# Kubernetes-managed hosts file (host network).
127.0.0.1	localhost
127.0.1.1	ubuntu16

# The following lines are desirable for IPv6 capable hosts
::1     localhost ip6-localhost ip6-loopback
ff02::1 ip6-allnodes
ff02::2 ip6-allrouters
wsg@ubuntu16:~$
所以,问题变为 有的 pod上可以访问 internet,有的pod 无法访问。
- 检查pod的host 和resolv.conf配置
  wsg@ubuntu16:~/helm/jenkins/aliyun$ kubectl -n ci exec jenkins-5494d984bf-js2kk -- sh -c 'cat /etc/hosts'
  # Kubernetes-managed hosts file.
  127.0.0.1	localhost
  ::1	localhost ip6-localhost ip6-loopback
  fe00::0	ip6-localnet
  fe00::0	ip6-mcastprefix
  fe00::1	ip6-allnodes
  fe00::2	ip6-allrouters
  10.36.0.1	jenkins-5494d984bf-js2kk

  wsg@ubuntu16:~/helm/jenkins/aliyun$ kubectl -n ci exec jenkins-5494d984bf-js2kk -- sh -c 'cat /etc/resolv.conf'
  nameserver 10.96.0.10
  search ci.svc.cluster.local svc.cluster.local cluster.local
  options ndots:5
-
查看dns pod
wsg@ubuntu16:~/helm/jenkins/aliyun$ kubectl get pods --namespace=kube-system -l k8s-app=kube-dns -o wide NAME READY STATUS RESTARTS AGE IP NODE NOMINATED NODE READINESS GATES coredns-fb8b8dccf-7tjxn 1/1 Running 43 317d 10.32.0.47 ubuntu16 <none> <none> coredns-fb8b8dccf-vdfrb 1/1 Running 43 317d 10.32.0.51 ubuntu16 <none> <none> wsg@ubuntu16:~/helm/jenkins/aliyun$ -
查看pod log
wsg@ubuntu16:~/helm/jenkins/aliyun$ kubectl logs --namespace=kube-system coredns-fb8b8dccf-7tjxn .:53 2020-02-04T06:27:52.065Z [INFO] CoreDNS-1.3.1 2020-02-04T06:27:52.065Z [INFO] linux/amd64, go1.11.4, 6b56a9c CoreDNS-1.3.1 linux/amd64, go1.11.4, 6b56a9c 2020-02-04T06:27:52.065Z [INFO] plugin/reload: Running configuration MD5 = 599b9eb76b8c147408aed6a0bbe0f669 wsg@ubuntu16:~/helm/jenkins/aliyun$ wsg@ubuntu16:~/helm/jenkins/aliyun$ wsg@ubuntu16:~/helm/jenkins/aliyun$ kubectl logs --namespace=kube-system coredns-fb8b8dccf-vdfrb .:53 2020-02-04T06:27:51.536Z [INFO] CoreDNS-1.3.1 2020-02-04T06:27:51.536Z [INFO] linux/amd64, go1.11.4, 6b56a9c CoreDNS-1.3.1 linux/amd64, go1.11.4, 6b56a9c 2020-02-04T06:27:51.536Z [INFO] plugin/reload: Running configuration MD5 = 599b9eb76b8c147408aed6a0bbe0f669 wsg@ubuntu16:~/helm/jenkins/aliyun$ -
查看 kube-dns service
service 信息如下: kube-system kube-dns ClusterIP 10.96.0.10 <none> 53/UDP,53/TCP,9153/TCP 316d k8s-app=kube-dns wsg@ubuntu16:~/helm/jenkins/aliyun$ kubectl get ep kube-dns --namespace=kube-system NAME ENDPOINTS AGE kube-dns 10.32.0.47:53,10.32.0.51:53,10.32.0.47:53 + 3 more... 317d -
dns 增加debug
wsg@ubuntu16:~$ wsg@ubuntu16:~$ kubectl -n kube-system edit configmap coredns # Please edit the object below. Lines beginning with a '#' will be ignored, # and an empty file wwsg@ubuntu16:~$ wsg@ubuntu16:~$ kubectl -n kube-system edit configmap coredns ill abort the edit. If an error occurs while saving this file will be# reopened with the relevant failures. # apiVersion: v1 data: Corefile: | .:53 { errors log health kubernetes cluster.local in-addr.arpa ip6.arpa { pods insecure -
问题原因
有问题host上
wsg@wsg-virtual-machine:~$ cat /etc/resolv.conf
# Dynamic resolv.conf(5) file for glibc resolver(3) generated by resolvconf(8)
#     DO NOT EDIT THIS FILE BY HAND -- YOUR CHANGES WILL BE OVERWRITTEN
nameserver 127.0.1.1
wsg@wsg-virtual-machine:~$


正常的host上
wsg@ubuntu16-template:~$ cat /etc/resolv.conf
# Dynamic resolv.conf(5) file for glibc resolver(3) generated by resolvconf(8)
#     DO NOT EDIT THIS FILE BY HAND -- YOUR CHANGES WILL BE OVERWRITTEN
nameserver 114.114.114.114
wsg@ubuntu16-template:~$
wsg@ubuntu16-template:~$
容器编译ceph时,异常报错如下
  CXX      mds/CInode.lo
  CXX      mds/DamageTable.lo
  CXX      mds/LogEvent.lo
  CXX      mds/MDSTable.lo
  CXX      mds/InoTable.lo
  CXX      mds/JournalPointer.lo
  CXX      mds/MDSTableClient.lo
  CXX      mds/MDSTableServer.lo
{standard input}: Assembler messages:
{standard input}:2300784: Warning: end of file not at end of a line; newline inserted
g++: internal compiler error: Killed (program cc1plus)
Please submit a full bug report,
with preprocessed source if appropriate.
See <file:///usr/share/doc/gcc-4.8/README.Bugs> for instructions.
make[4]: *** [mds/MDCache.lo] Error 1
make[4]: *** Waiting for unfinished jobs....
make[3]: *** [all-recursive] Error 1
make[4]: Leaving directory `/data_host/iscsi_git/GIT/virtualstor/ezs3-ceph/src'
make[2]: *** [all] Error 2
make[1]: *** [all-recursive] Error 1
make: *** [build-stamp] Error 2
make[3]: Leaving directory `/data_host/iscsi_git/GIT/virtualstor/ezs3-ceph/src'
make[2]: Leaving directory `/data_host/iscsi_git/GIT/virtualstor/ezs3-ceph/src'
make[1]: Leaving directory `/data_host/iscsi_git/GIT/virtualstor/ezs3-ceph'
dpkg-buildpackage: error: debian/rules build gave error exit status 2
[ root@bf2ef2f3cc44:/data_host/iscsi_git/GIT/virtualstor {virtualstor-7.0 *} ]$
Display all 2958 possibilities? (y or n)^C
[ root@bf2ef2f3cc44:/data_host/iscsi_git/GIT/virtualstor {virtualstor-7.0 *} ]$ bash -x wsg_build-ceph.sh |tee ../wsg_build_ceph-20200227.log
```